Secure Kubeflow Ingress and Authentication with Istio External Auth, Dex, and OAuth2 Proxy
Publicly exposed insecure service endpoints on Kubernetes produce a major risk of malicious workloads being deployed on your clusters. We’ve seen reports of the Kubernetes Dashboard, the Kubeflow Central Dashboard, and the Kubeflow Pipelines all were compromised when publicly exposed to the Internet. Combined with wide RBAC permissions, a publicly exposed software with workload scheduling capabilities opens your clusters for malicious deployments to anybody knowing the endpoint URL.
This blog post focuses on building a secure ingress and authentication stack on Kubernetes with Istio targeting Kubeflow installations. The post covers the existing approach used in the open-source Kubeflow distribution and its shortcomings and provides an alternative solution that uses the latest security features from Istio and an alternative authentication proxy.
Kubeflow Ingress and Authentication #
Overview #
The main open source Kubeflow releases reside in the kubeflow/manifests repository that aims at easing the installation and providing a tested starting point for derived distributions (link). The repository provides manifests for both the Kubeflow components and the dependencies required for the ingress and security stack such as Istio, Dex, and OIDC AuthService. Kubeflow relies on Istio for ingress, traffic routing, and authorization policies for multi-tenancy. Let’s consider the high-level ingress architecture and resource placement shown in the diagram below:

Kubeflow installation configures the default shared Istio Ingress Gateway running in the istio-system namespace using Gateway and VirtualService custom resources for routing and the EnvoyFilter for the request authorization. The EnvoyFilter forwards the incoming traffic to the OIDC AuthService that validates the authorization cookie and can either allow the request to proceed, deny it due to invalid authorization, or trigger an authentication workflow with an external system such as Dex.
Shortcomings of the existing approach #
Tight coupling of the ingress stack with Kubeflow #
Kubeflow relies on several external systems for its security-related features: cert-manager, Istio, Dex, and OIDC AuthService. The convenience of kubeflow/manifests providing all of these dependencies in one place brings additional coupling when the ingress resources are deployed. For example, Gateway and EnvoyFilter resources are deployed in the kubeflow namespace but at the same time, they configure the default Istio Ingress Gateway running in the istio-system namespace that can be used by other services in the cluster. When the Gateway is uninstalled, the configuration for the shared ingress gateway is dropped with it too.
When Kubeflow installation becomes yet another cluster citizen, it should be able to seamlessly integrate with the existing platform-side components without producing alternative authentication paths or overwriting existing routes in the default Istio Gateway.
Use of the insecure Gateway and endpoints #
As of version 1.4, the Kubeflow manifests use HTTP Gateway without any TLS in place. TLS is an essential security measure nowadays and, surprisingly, publicly exposed endpoints serve plaintext HTTP disregarding the environment they are deployed into (e.g. on-premise or air-gapped clusters).
The Dex installation coming with Kubeflow is also exposed via the same Gateway and its clients (such as OIDC AuthService) don’t have a way to verify the identity of the service. Although the OIDC AuthService supports the functionality for verifying the OIDC provider endpoint by providing a CA bundle it is not utilized.
EnvoyFilter maintainability issue #
Envoy’s ext_authz filter configured with the EnvoyFilter CRD used for forwarding requests to the OIDC AuthService is a pretty low-level primitive which could be difficult to maintain and troubleshoot. The major pain points are described in the Istio Better External Authorization design doc. Here are a few excerpts that are relevant for Kubeflow:
- No support for the conditional triggering of the external authorization flow. Some paths don’t need it (e.g. user-facing authentication endpoint itself).
- As
ext_authzdepends on the Envoy API, theEnvoyFiltercan start failing after a small change in the upstream. Sometimes they are failing silently. - Overall difficult maintenance and troubleshooting of the
EnvoyFilterCRD.
OIDC AuthService maintenance and community support #
OIDC AuthService is a great solution for the auth proxy, however, the project’s GitHub doesn’t look very active and it is not clear what amount of maintenance it receives. It also doesn’t have any releases in its GitHub repository so the whole release process is opaque. The single source of truth seems to be the Docker image tag (commit hash) used in manifests. Another concern with OIDC AuthService is that it seems to be tailored for Kubeflow needs only and is not used in any other setup. This could make it potentially vulnerable for non-Kubeflow specific use-cases that haven’t been tested but might happen in production deployments.
Proposed solution for Secure Ingress and External Authentication #
Overview #
Decoupling the ingress stack from Kubeflow #
The ingress and authentication stack should be treated as a cluster-scoped entity so that all cluster tenants (services and applications) can integrate with it and benefit from the pre-configured security and authentication flow. That way, Kubeflow becomes another consumer of the authentication stack and doesn’t deal with the installation of the security primitives.
Independent installation and management of the ingress and authentication stack allows using the latest stable software versions and the recommended installation methods such as official Helm Charts instead of the back-ported manifests
Securing the Endpoints #
Istio natively supports TLS at the Gateway and with the Cert-manager available on the cluster, it is possible to create a CA ClusterIssuer and provide a certificate to the Gateway. The CA ClusterIssuer can then also be used to mount a CA file to the authentication proxy for validating the Dex identity. Additionally, it is beneficial to enable mutual TLS for all user-facing and authentication-related components when possible (not all Kubeflow components work well when Istio sidecars are injected).
Using Istio External Auth #
Starting from version 1.9 Istio supports external authorization and allows configuring AuthorizationPolicies to delegate authorization to external systems. This functionality came to replace the low-level EnvoyFilter configuration API and was driven by the shortcomings of the ext_authz approach. There’s a great blog post from Istio describing it: Better External Authorization.
Migrating to OAuth2 Proxy with Dex #
Dex is a popular choice for Kubernetes authentication used in production, however, an alternative solution will be used instead of OIDC AuthService. OAuth2 Proxy looks like a better alternative based on its functionality, GitHub activity, availability of the versioned releases, quality documentation, and the official Helm Chart for the installation.
Deployment layout #
Let’s consider the following deployment and ingress diagram for a dedicated Kubeflow cluster:
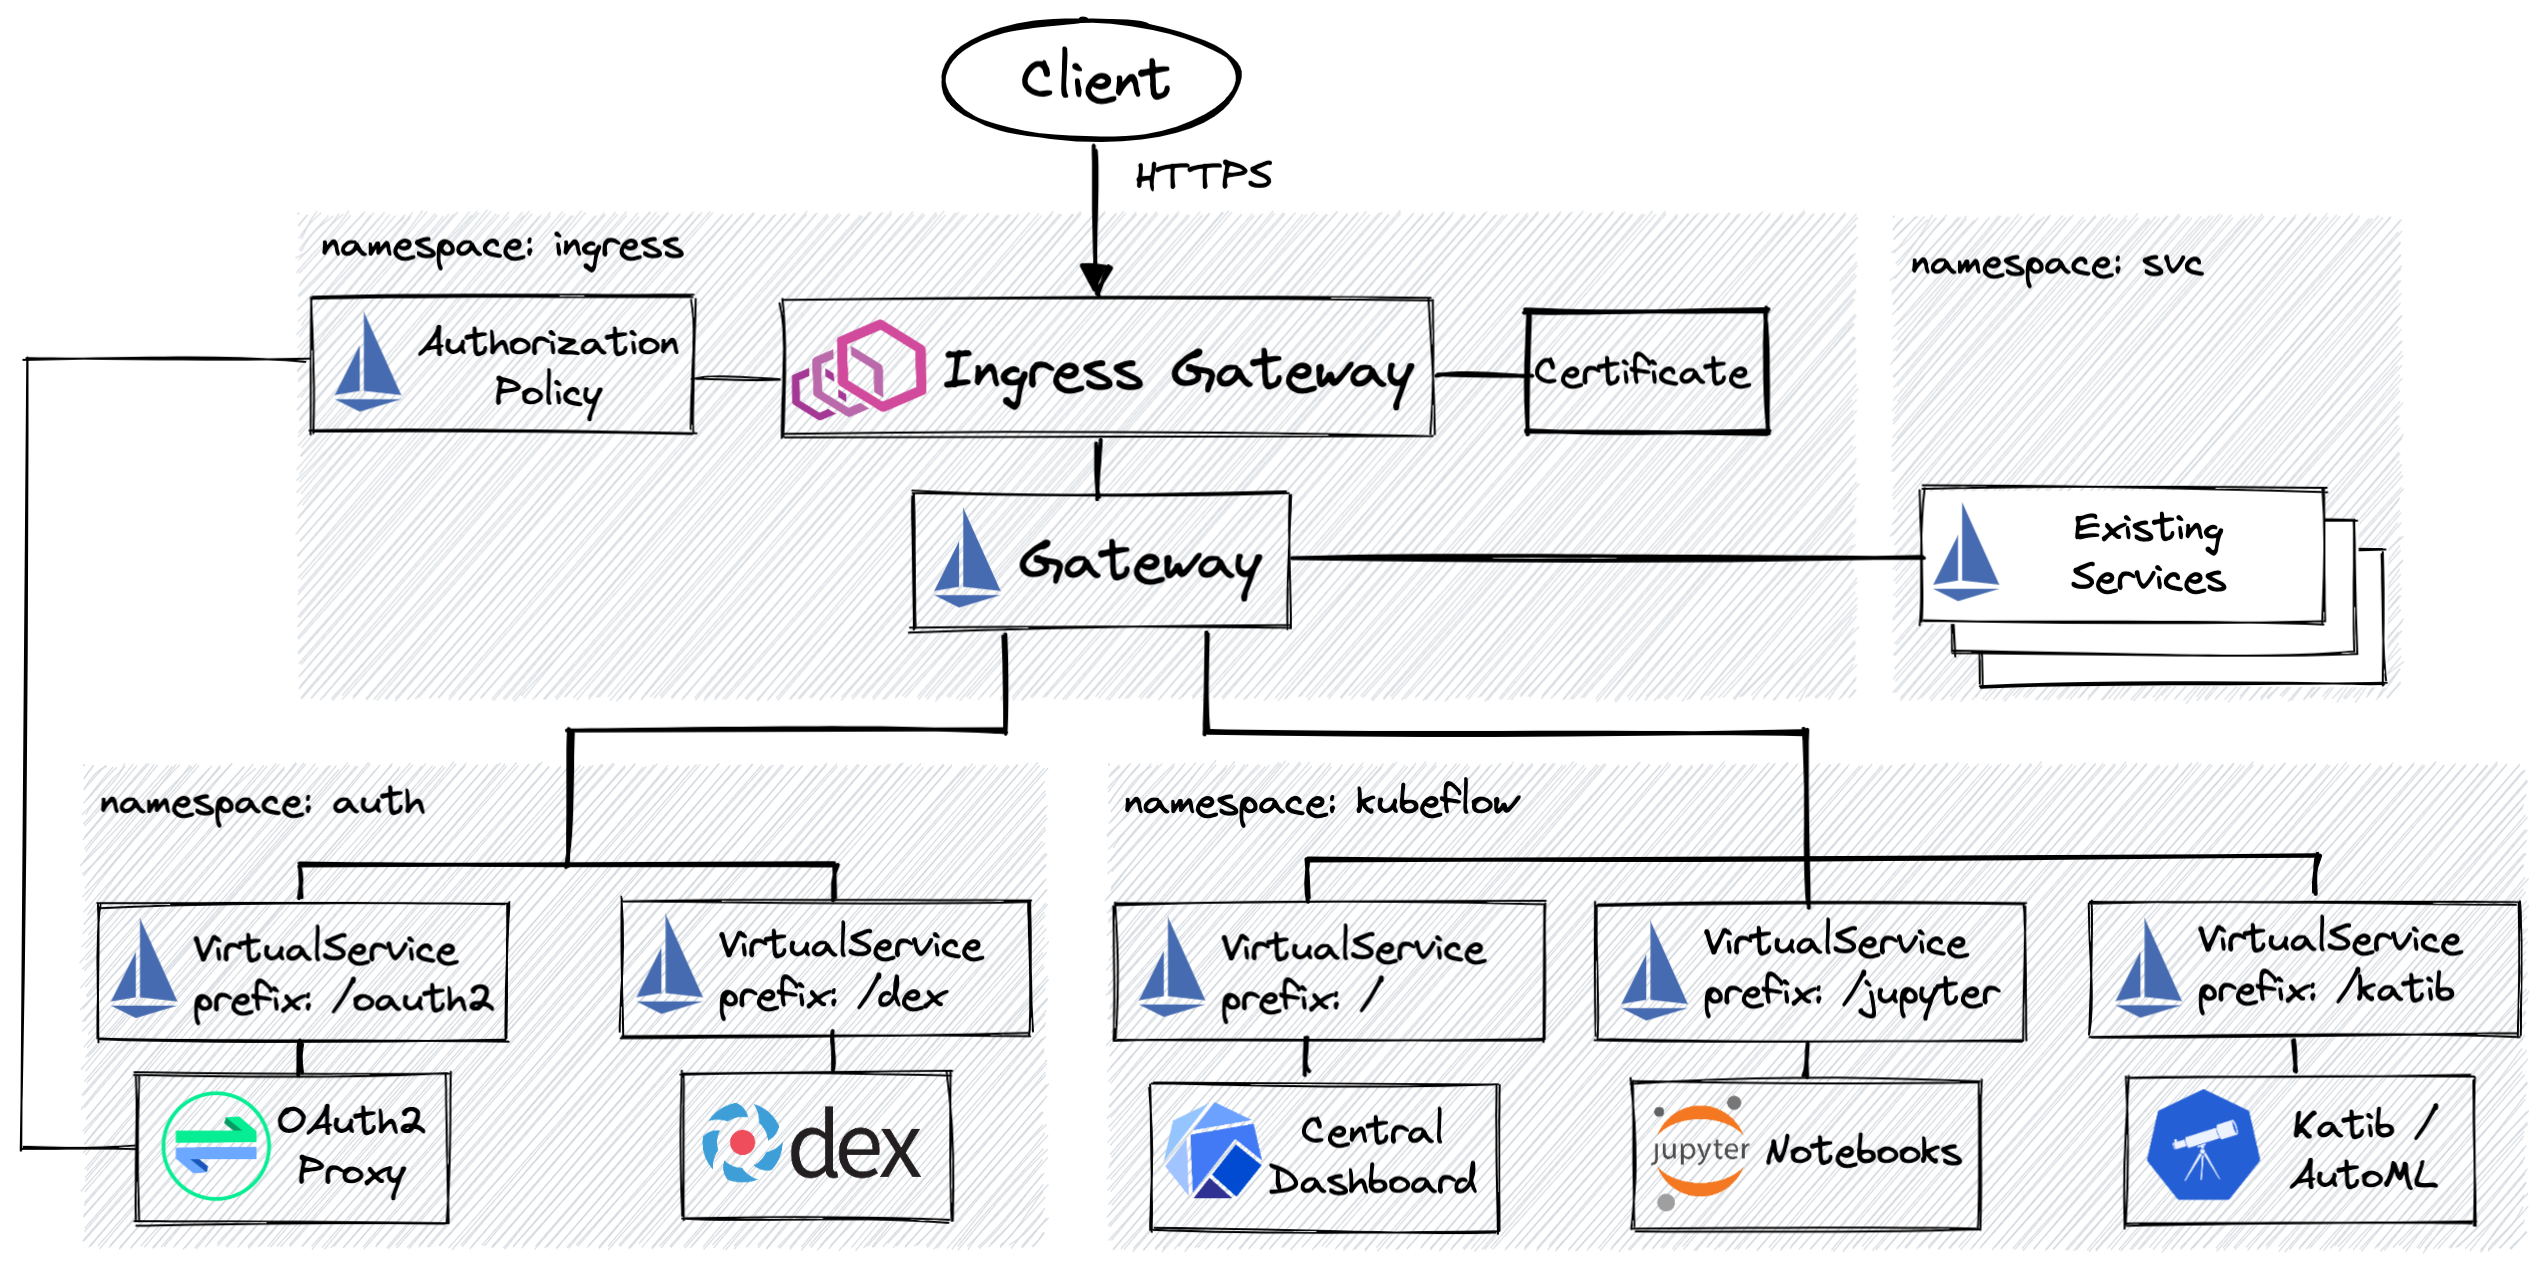
There are several differences and improvements compared to the default Kubeflow installation:
- The proposed layout follows the idea of the centralized security and authentication stack independent from Kubeflow. The consumers of the stack can be added to or removed from a cluster without affecting other consumers. This setup is beneficial for installations where Kubeflow is yet another tenant sharing the cluster with other business applications.
- The Secure Istio Gateway with TLS termination running in a dedicated ingress namespace as the security best practice doesn’t recommend installing it in the Istio namespace and uses a
Certificateissued by the cert-manager. - Istio External Authorization is configured for the Ingress Gateway by an
AuthorizationPolicyand verifies the incoming requests with Dex via OAuth2 Proxy. Dex and OAuth2 Proxy haveVirtualServiceroutes defined for them and will be using the Ingress Gateway address for the authentication endpoints and callbacks so that both internal and external users and systems have the access to them. This setup is useful when the OIDC provider is external to the cluster or running at a different address. - Security-related components deployed in a dedicated namespace and can have additional policies applied to them in a narrow scope. This layout is also beneficial if other services running on the cluster and which require authentication but are not related to Kubeflow, for example, user-facing Grafana and Prometheus.
Implementing Secure Ingress and Authentication #
This section contains practical steps and code snippets for installing and configuring the secure ingress and authentication stack. It mostly focuses on the generic part that applies to any cluster that requires setting up the security, and at the end provides a sub-section with a basic Kubeflow installation to verify the setup.
The main topics covered in this section include setting up required security dependencies with Helm, creating a CA ClusterIssuer with a self-signed CA, configuring secure ingress, configuring Istio External Authorization, installing and configuring OAuth2 Proxy and Dex for authentication, and installing a minimalistic Kubeflow distribution.
NOTE: The following tutorial was created on an on-premises deployment with MetalLB assigning addresses for
Serviceswith theLoadBalancertype. The exposed ingress endpoints with the network IPs assigned will be referenced by the IP address instead of FQDN for simplicity and to avoid setting up and configuring a DNS Server.
Securing the Ingress Gateway #
The first step in configuring secure ingress on a cluster is to get the required software and configure it to serve the traffic. Disregarding whether it is required solely for Kubeflow or generic cluster security, this part of the setup will be the same.
Installing Cert-manager, Istio, and Ingress Gateway #
Installing cert-manager:
helm repo add jetstack https://charts.jetstack.io
helm repo update

helm install cert-manager jetstack/cert-manager \
  --version v1.6.1 \
  --set installCRDs=true \
  --namespace cert-manager \
  --create-namespace
Istio ships independent Helm Charts for CRDs, Istiod, and the Ingress Gateway. The source code for the Charts can be found here. At this point, only CRDs and Istiod will be needed:
helm repo add istio https://istio-release.storage.googleapis.com/charts
helm repo update

helm install istio-base istio/base \
  --version 1.12.1 \
  --namespace istio-system \
  --create-namespace

helm install istiod istio/istiod \
  --version 1.12.1 \
  --namespace istio-system \
  --wait
Create the Istio Ingress Gateway in a dedicated ingress namespace:
helm install istio-ingressgateway istio/gateway \
  --version 1.12.1 \
  --namespace ingress \
  --create-namespace
  --wait
The Ingress Gateway from this Chart creates an Envoy Proxy Deployment and a Service with the LoadBalancer type. At this point there are no routes defined and all requests to the Service will be dropped (you can check it with curl). Verify the Service has the external address assigned. For example:
kubectl get svc istio-ingressgateway -n ingress

NAME                   TYPE           CLUSTER-IP      EXTERNAL-IP      PORT(S)                                      AGE
istio-ingressgateway   LoadBalancer   10.99.197.129   192.168.50.150   15021:31107/TCP,80:32027/TCP,443:31920/TCP   11m
Creating CA ClusterIssuer for signing certificates #
For simplicity, we will be using the ClusterIssuer to ease the certificate issuance and use the same CA for signing all certificates. For that, it is required to create a CA key and certificate to provide to the Cert-manager ClusterIssuer. We will use cfssl but any other appropriate
tool can be used instead.
Create a CSR (Certificate Signing Request) file in json format. For example:
cat <<EOF > csr.json
{
  "CN": "Datastrophic",
  "key": {
    "algo": "rsa",
	"size": 2048
  },
  "names": [
    {
	  "C": "US",
	  "L":
	  "San Francisco",
	  "O": "Datastrophic",
	  "ST": "California"
	}
  ]
}
EOF
Then, run cfssl to generate the initial CA key and certificate:
cfssl gencert -initca csr.json | cfssljson -bare ca
Create a Kubernetes Secret to hold the key and certificate, as per cert-manager docs. The secret for the ClusterIssuer should be created in the “cluster resource namespace” which defaults to cert-manager:
kubectl create secret tls ca-secret \
  --namespace cert-manager \
  --cert=ca.pem \
  --key=ca-key.pem
Create a CA ClusterIssuer referencing the previously created Secret:
kubectl apply -f - <<EOF
apiVersion: cert-manager.io/v1
kind: ClusterIssuer
metadata:
  name: ca-issuer
spec:
  ca:
    secretName: ca-secret
EOF
Verify the ClusterIssuer is ready:
kubectl get clusterissuer -o wide

NAME      READY   STATUS                AGE
ca-issuer True    Signing CA verified   2s
More ClusterIssuer configuration options available in the Cert-manager docs.
Configuring Istio Gateway to serve HTTPS traffic #
To expose services via HTTPS, it is required to configure a secure Istio Gateway. For this purpose, we will use Cert-manager to issue a certificate for the Istio Ingress Gateway address and provide it to the Gateway.
Discover the IngressGateway address to use in the certificate:
export INGRESS_HOST=$(kubectl get svc istio-ingressgateway --namespace ingress -o yaml -o jsonpath='{.status.loadBalancer.ingress[0].ip}')
NOTE: if running in the cloud and the
LoadBalancerservice type is bound to a load balancer, then.status.loadBalancer.ingress[0].ipmight render an empty result. If aLoadBalancerservice has a DNS name assigned to it, use.status.loadBalancer.ingress[0].hostnameinstead. Alternatively, runkubectl describe svc istio-ingressgateway --namespace ingressand save the publicly exposed address.
The Certificate would look as follows (we’ll be using the IP address from the previous step in the ipAddresses field):
kubectl apply -f - <<EOF
apiVersion: cert-manager.io/v1
kind: Certificate
metadata:
  name: gateway-cert
  namespace: ingress
spec:
  secretName: gateway-cert
  ipAddresses:
  - "${INGRESS_HOST}"
  duration: 2160h # 90d
  renewBefore: 360h # 15d
  subject:
    organizations:
      - Datastrophic
  issuerRef:
    name: ca-issuer
    kind: ClusterIssuer
EOF
Verify the Certificate is created:
kubectl get certificate gateway-cert -o wide -n ingress

NAME           READY   SECRET         ISSUER      STATUS                                          AGE
gateway-cert   True    gateway-cert   ca-issuer   Certificate is up to date and has not expired   16s
Create a secure Istio Gateway that configures the Ingress proxies to use the certificate created at the previous step:
kubectl apply -f - <<EOF
apiVersion: networking.istio.io/v1beta1
kind: Gateway
metadata:
  name: ingress-gateway
  namespace: ingress
spec:
  selector:
    app: istio-ingressgateway
	istio: ingressgateway
  servers:
  - port:
      number: 443
      name: https-main
      protocol: HTTPS
    hosts:
    - "*"
    tls:
      mode: SIMPLE
      credentialName: gateway-cert
EOF
Before deploying the Gateway, curl to https://$INGRESS_HOST returns Connection refused. However, after the Gateway was created, the certificate can be verified by running:
curl --cacert ca.pem -v https://$INGRESS_HOST
Where --cacert ca.pem points to the previously created root CA. It is expected that the above command returns 404 as there are no VirtualService routes configured yet.
Authorizing user requests #
After the TLS ingress is configured, we can now proceed with Istio External Authorization, Dex, and OAuth2 Proxy. As a result, the Istio Ingress Gateway will be using OAuth2 Proxy as an external authorization service which in turn will trigger authorization flow with Dex. Dex configuration for this blog post will serve static users but can be configured to work with supported providers.
First, let’s create a dedicated authnamespace with Istio sidecar injection enabled:
kubectl create -f - <<EOF
apiVersion: v1
kind: Namespace
metadata:
  name: auth
  labels:
    istio-injection: enabled
EOF
Installing Dex and configuring clients #
Dex will be installed using Helm, and an example Dex configuration can be found here. In the configuration below, the Dex configuration contains a record for an OAuth2 Proxy static client that at this point is not yet installed. It also includes two static users for testing:
# bcrypt hash for "password"
export PWD_HASH=$(htpasswd -bnBC 10 "" password | tr -d ':\n')

cat <<EOF > dex-values.yaml
config:
  issuer: "https://${INGRESS_HOST}/dex"

  storage:
    type: kubernetes
    config:
      inCluster: true

  oauth2:
    skipApprovalScreen: true

  staticClients:
  - id: oauth2-proxy
    name: OAuth2 Proxy
    secret: "LG7jUjNiyVDPJdlarO5Mgz3CxS7kNL/1OZ0spRsL"
    redirectURIs:
      - "https://${INGRESS_HOST}/oauth2/callback"

  # Password DB must be enabled in order to specify static users
  enablePasswordDB: true
  staticPasswords:
  - email: "user1@datastrophic.io"
    hash: "${PWD_HASH}"
  - email: "user2@datastrophic.io"
    hash: "${PWD_HASH}"
EOF
Install Dex with the provided configuration:
helm repo add dex https://charts.dexidp.io
helm repo update

helm install dex dex/dex \
  --version 0.6.3 \
  --values dex-values.yaml \
  --namespace auth \
  --wait
Expose Dex at the endpoint’s /dex path via a VirtualService:
kubectl apply -f - <<EOF
apiVersion: networking.istio.io/v1beta1
kind: VirtualService
metadata:
 name: dex
 namespace: auth
spec:
 hosts:
 - "*"
 gateways:
 - ingress/ingress-gateway
 http:
 - name: "dex"
   match:
   - uri:
       prefix: "/dex"
   route:
   - destination:
       host: dex.auth.svc.cluster.local
       port:
         number: 5556
EOF
Installing OAuth2 Proxy #
OAuth2 Proxy has quite a few configuration options described in oauth2-proxy documentation
and available in the example values.yaml in GitHub. The majority of the examples set ssl_insecure_skip_verify parameter to true to skip the verification of the OIDC provider endpoint. This is convenient when it is running with a self-signed certificate, however, if the certificate verification is skipped, this means we’re ignoring who is authenticating the users. In this setup, a dedicated certificate will be issued for the ingress endpoint running Dex and mounted to the OAuth2 Proxy for validating the certificates against the CA.
Create a second certificate for the Gateway address but in the auth namespace:
kubectl apply -f - <<EOF
apiVersion: cert-manager.io/v1
kind: Certificate
metadata:
  name: gateway-cert
  namespace: auth
spec:
  secretName: gateway-cert
  ipAddresses:
  - "${INGRESS_HOST}"
  duration: 2160h # 90d
  renewBefore: 360h # 15d
  subject:
    organizations:
      - Datastrophic
  issuerRef:
    name: ca-issuer
    kind: ClusterIssuer
EOF
Create the OAuth2 Proxy Helm configuration:
cat <<EOF > oauth2-proxy-values.yaml
config:
  clientID: "oauth2-proxy"
  # openssl rand -base64 32 | head -c 40
  clientSecret: "LG7jUjNiyVDPJdlarO5Mgz3CxS7kNL/1OZ0spRsL"
  # openssl rand -base64 32 | head -c 32 | base64
  #cookieSecret: "SXRNTGYzNUFtNi9MTGUvbXJmUnlLdUlYTU00a29ick4="
  configFile: |-
    provider = "oidc"
    provider_ca_files = "/etc/gateway-cert/ca.crt"
    oidc_issuer_url = "https://${INGRESS_HOST}/dex"

    set_authorization_header = true
    set_xauthrequest = true
    cookie_samesite = "lax"

    email_domains = ["*"]
    skip_provider_button = true
    upstreams = [ "static://200" ]

extraVolumes:
  - name: gateway-cert
    secret:
      secretName: gateway-cert

extraVolumeMounts:
  - mountPath: /etc/gateway-cert/
    name: gateway-cert
EOF
Install OAuth2 Proxy with the provided configuration:
helm repo add oauth2-proxy https://oauth2-proxy.github.io/manifests
helm repo update

helm install oauth2-proxy oauth2-proxy/oauth2-proxy \
  --version 5.0.6 \
  --namespace auth \
  --values oauth2-proxy-values.yaml \
  --wait
Expose OAuth2 Proxy at the endpoint’s /oauth2 path via a VirtualService:
kubectl apply -f - <<EOF
apiVersion: networking.istio.io/v1beta1
kind: VirtualService
metadata:
 name: oauth2-proxy
 namespace: auth
spec:
 hosts:
 - "*"
 gateways:
 - ingress/ingress-gateway
 http:
 - name: "oauth2"
   match:
   - uri:
       prefix: "/oauth2"
   route:
   - destination:
       host: oauth2-proxy.auth.svc.cluster.local
       port:
         number: 5556
EOF
Configuring Istio External Authorization #
Istio External Authorization is a mesh-wide configuration property that is applied to Istiod. In the example below, we register a new external authorization service (OAuth2 Proxy):
cat <<EOF > istio-values.yaml
meshConfig:
  extensionProviders:
    - name: oauth2-proxy
      envoyExtAuthzHttp:
        service: oauth2-proxy.auth.svc.cluster.local
        port: 80
        includeHeadersInCheck: ["authorization", "cookie"]
        headersToUpstreamOnAllow: ["authorization", "path", "x-auth-request-user", "x-auth-request-email", "x-auth-request-access-token"]
        headersToDownstreamOnDeny: ["content-type", "set-cookie"]
EOF

helm upgrade istiod istio/istiod \
  --namespace istio-system \
  --values istio-values.yaml \
  --wait

kubectl rollout restart deployment/istiod -n istio-system
And to enable the external authorization, it is required to apply the AuthorizationPolicy referencing the above extension provider to the Istio Ingress Gateway:
kubectl apply -f - <<EOF
apiVersion: security.istio.io/v1beta1
kind: AuthorizationPolicy
metadata:
  name: external-auth
  namespace: ingress
spec:
  selector:
    matchLabels:
      app: istio-ingressgateway
      istio: ingressgateway
  action: CUSTOM
  provider:
    name: oauth2-proxy
  rules:
    - to:
        - operation:
            hosts: ["*"]
            notPaths: ["/dex/*"]  # skipping Dex running on the same Gateway to avoid redirect loops
EOF
Now, everything is ready and all unauthorized requests should be redirected to Dex by OAuth2 Proxy. To verify that, navigate to https://$INGRESS_HOST in your browser. There are two static users user1@datastrophic.io and user2@datastrophic.io with a password: password. As we don’t have user-facing applications running yet, you’ll be redirected to the root path and get a 404 which is expected.
Base Kubeflow installation #
To verify the secure ingress for Kubeflow, let’s install several basic components, log in as different users, and use the collaboration feature to share a notebook.
datastrophic/kubeflow-kustomize repository contains kustomizations for a demo installation of the Kubeflow based on kubeflow/manifests repository. The kustomizations in the repository modify base manifests to make them work with the custom Istio Gateway and OAuth2 Proxy headers. The kustomizations also patch the Central Dashboard VirtualService to add a redirect for /logout path to the OAuth2 Proxy sign out endpoint:
apiVersion: networking.istio.io/v1beta1
kind: VirtualService
metadata:
  name: centraldashboard
spec:
  gateways:
  - ingress/ingress-gateway
  http:
  - match:
    - uri:
        exact: /logout
    name: logout
    redirect:
      uri: /oauth2/sign_out
  - match:
    - uri:
        prefix: /
    rewrite:
      uri: /
    route:
    - destination:
        host: centraldashboard.kubeflow.svc.cluster.local
        port:
          number: 80
To install the basic components of Kubeflow, clone the repository and from the root directory run:
kubectl apply -k kubeflow
Once all pods in the Kubeflow namespace are up and running, navigate to https://$INGRESS_HOST. The Gateway should redirect the browser to the Dex login page and, after the login is successful, to the Central Dashboard page. Below, is a quick demo:
This demonstrates that the external authorization policy works as expected, required headers are set by the authentication workflow, AuthorizationPolicies are applied correctly, and the configuration of Kubeflow components is compatible with the provided authorization stack.
Conclusion #
Setting up the secure ingress with authentication requires an understanding of all the moving parts and interactions between them to address this task properly. Treating the authentication stack independently of the applications that depend on it looks preferable from the cluster management perspective when multiple applications benefit from the centralized solution.
The manual installation is pretty involving and error-prone. As there are several systems with non-trivial configuration involved, these steps are great candidates for being automated and installed as self-contained units of the infrastructure with solutions such as Flux or ArgoCD.
References #
- Istio documentation on Traffic Management
- Better External Authorization blog post from Istio
- Istio documentation on best practices for Installing Gateways
- Istio OIDC Authentication blog post from JetStack
- Configuring Istio with OIDC authentication blog post by Justin Gauthier